By Dan Calabrese
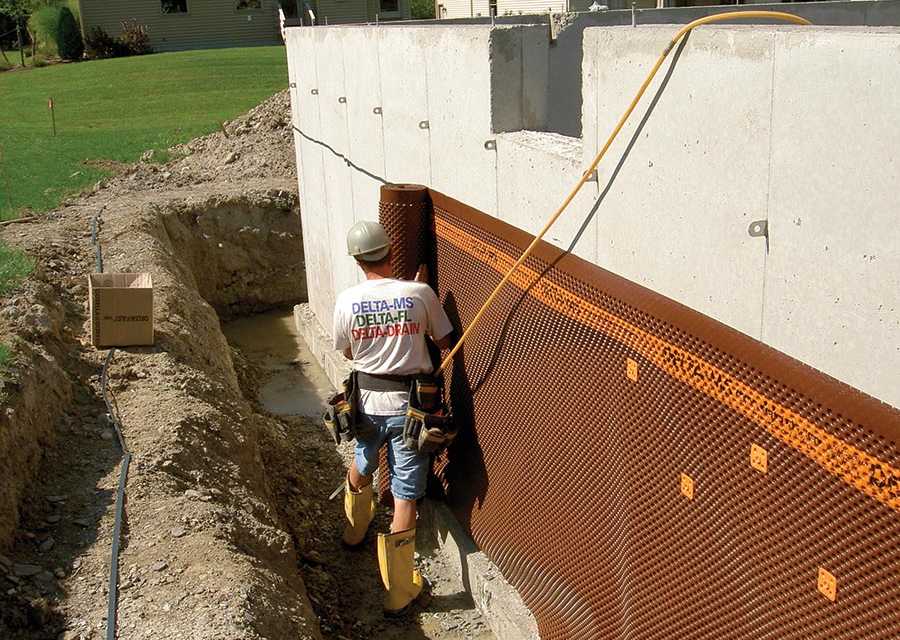
Drain sheets like this dimple membrane relieve hydrostatic pressure and increase the
reliability of waterproofing.
In foundation waterproofing, as with most things, prevention is far more effective than correction. So if your objective is to keep water from seeping into the basement and damaging the foundation, nothing works better than draining water away from the house as efficiently as possible.
When problems occur, contractors say they usually arise from poor installation of foundation drains and improper backfilling and grading of soil around the house. If these parts are done right, there won’t be much water against which to waterproof. Do them wrong, and the problems could soak you in more ways than one.
Tim Carter, owner of the AsktheBuilder.com web site and a veteran general contractor, said successful drainage starts with the proper application of drain tile – but he warned that this is where trouble often starts, because not enough builders take the time to install drain tile correctly.
“I always like to install the drain tile on the side of the foundation footer,” Carter said. “Many builders simply install it on top of the footer. Installing the drain tile on top of the footer means that your water table will be at the top of the footer. My method puts the water table about six inches below the top of the footer. You want the water level as low as possible.”
Equally important, according to Carter, is to put the water as far away from the basement as possible.
“By putting it on top of the footer, you’ll have 100% saturation of the soil and of the gravel fill directly beneath the basement slab,” Carter said. “That’s where the drain tile is. And who wants a bunch of water under the basement slab?”
Carter recommends that drain tile be installed the day after footings are poured.
A sloped lot helps, but is not necessary.
“If you’re building on a sloped lot, maybe you are lucky to have enough fall within your property line whereby the drain tile can daylight,” Carter said. “There is no need for the pipe to have a slope. It can be laid virtually perfectly level from the footer until it daylights. The net result is that you are simply providing a resistance-free path for the water around your foundation to escape.”
Otherwise, you may have to install a sump pump, as Carter had to do in his own basement. Carter prefers to install a six-inch pipe under the footer location, prior to pouring, right where he plans to install the sump. He cautions that the pump has to send the water to a stormwater drainage system or another location far away from the house. Steve Gross, director of marketing with Form-a-Drain, said footing drains should be standard, regardless of what local codes may require.
“The bottom line is keeping the water table from rising above the top of the footer,” Gross said. “Once that happens, you may have lost the battle, depending on what kind of protective measure you’ve taken.”
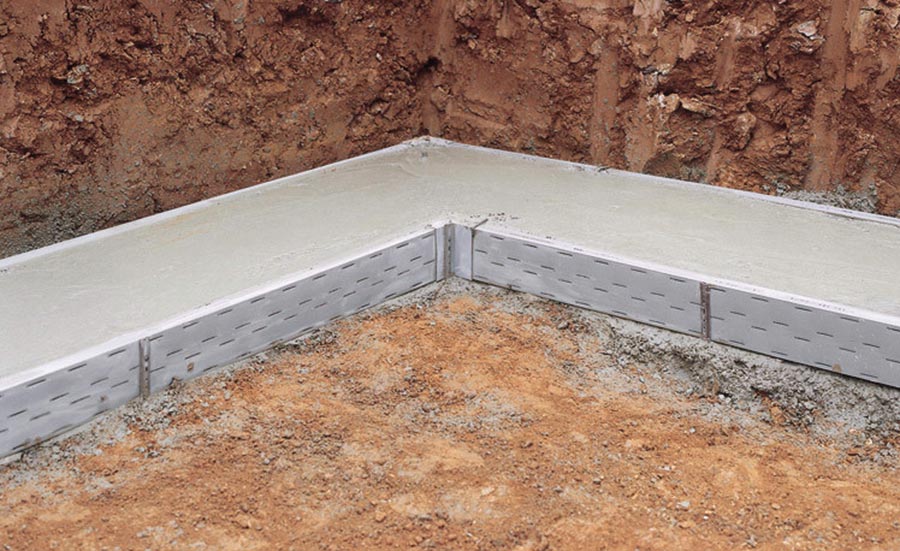
He said Form-a-Drain is designed to ensure that placement.
“It automatically places the drain right at the top of the footing where you want it,” Gross said. “It’s perfectly level. It’s a rigid manufactured product, and it can be supplied with the fabric right on the drain if that’s a requirement.”
Gross also emphasized that sump pumps will be most effective when water can move in and out via a direct path. He said Form-a-Drain’s footing drain was also designed with that in mind.
Just as important is the right application of either gravel or a suitable alternative.
“One huge mistake is the failure to install a layer of washed gravel around the drain tile,” Carter said. “And the more gravel you can put in, the better. The gravel allows the water not to pond around the low levels of the foundation. That’s what gets the water to the drain tile so the drain tile can vacuum it away from the foundation and discharge it at some low spot away from the house.”
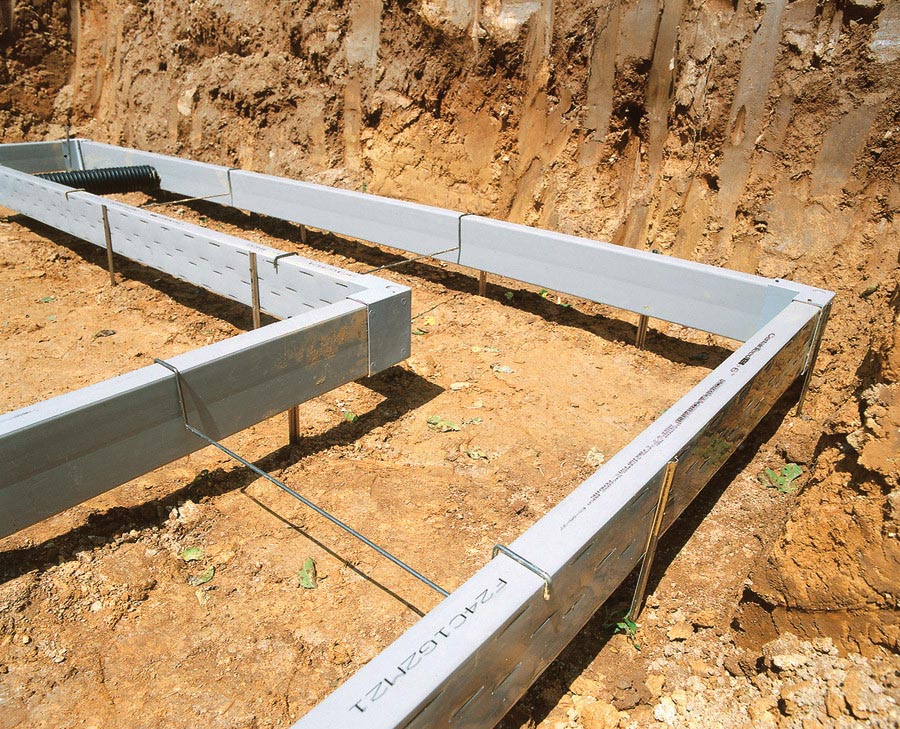
These footing drains double as footing forms, ensuring that the drain tile is installed at the proper height.
Gravel has been a lifesaver for Carter on some jobs involving difficult slopes.
“There have been some jobs in the past where we were so worried because the house was on a hillside,” Carter said. “On the uphill side, I completely filled that side of the foundation with gravel.”
Carter recommends two or three feet of one-inch diameter gravel over the footing drain, which he recommends covering with tar paper or a six-inch layer of straw. That protects the gravel, and ultimately the drain tile, from getting clogged with fine soil particles.
The elimination of straw or tar paper is a huge mistake, he said, but it’s a common one.
“Contractors eliminate straw and tar paper because they want to save money and they want to save time,” Carter said. “They don’t understand the siltation process of fluff dirt.”
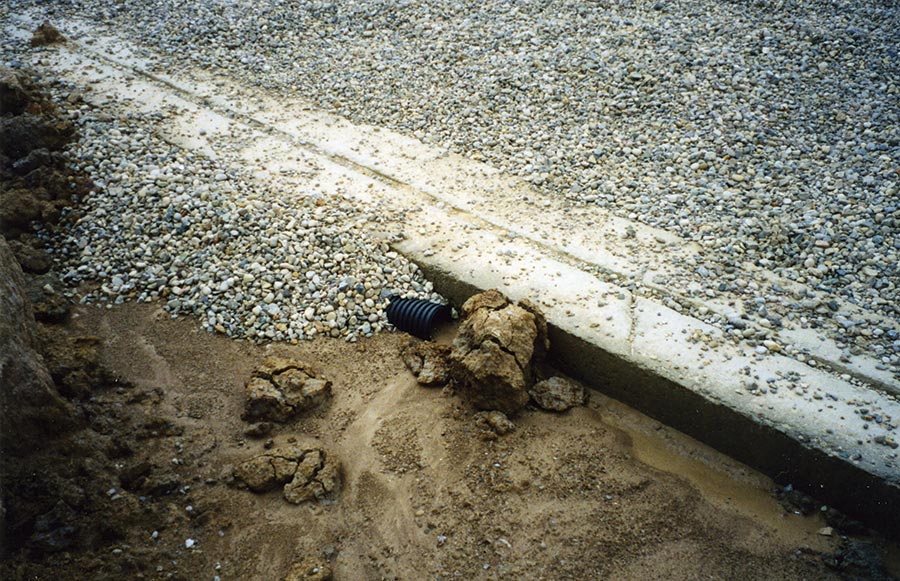
The large chunk of dirt in this photo, and any soil in the pipe, will need to be removed before the drain system can be finished.
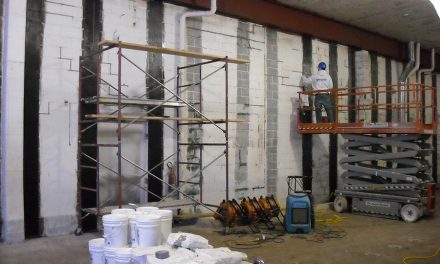
Cosella Doerken’s Tom Fallon emphasizes the importance of drain boards in the design of an effective waterproofing system.
“We see drain boards as part of a belts-and-suspenders approach to waterproofing,” Fallon said. “Where liquid- or sheet-applied waterproofings are adhered to the wall, drain boards are extremely easy to attach. We don’t spend a lot of time worrying about the intricacies of it. They’re simple to put on, and it’s easiest to attach them with a nail. This is a bit of a paradigm shift for a lot of people, because they always think of waterproofing and nails as no-nos. But if you picture an asphalt shingle, it’s nailed on and it can work very well. Mechanically fastening is always the best.”
Cosella Doerken developed fabric as an alternative to gravel, partly to eliminate the energy costs involved with trucking gravel long distances.
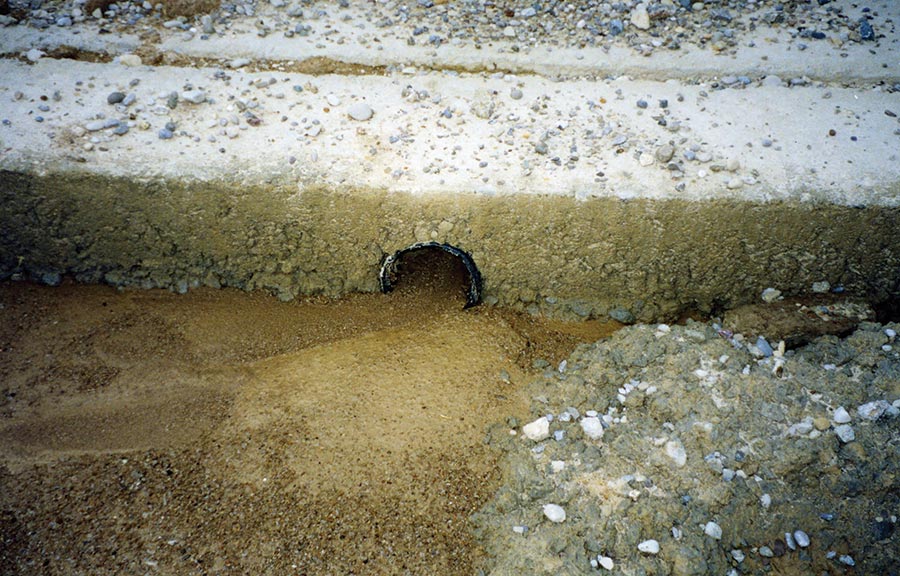
This drain pipe through the footer is already half filled with mud due to heavy rains shortly after the footing was poured. Like the photo above, the builder failed to slope the ground away from the excavation
“The reason people use crushed rock is that it doesn’t pack together well, and that allows the water to move very easily into the footer drain,” Fallon said. “So instead of using tons of fuel to haul tons of rock, drainboards do the same as rock. They create an air space. The fabric keeps the earth away from it, so it accomplishes quite a few things. Behind the fabric is this dimple-shaped plastic, and that creates a huge void. And the water, as soon as it goes through the fabric, loses all its energy, so gravity will make it fall.”
Cosella Doerken drain boards are made of high-density polyethylene, and can be made up to 10 feet high and 65 feet long.
Mike Kreikemeier, president of Atlanta-based JDR, which manufactures the J-Drain, said geotextiles can be very effective in keeping soil from clogging the aggregate. They are widely used on both vertical dimpled drain sheets and horizontal drain tiles.
Kreikemeier says that one key is to ensure that the top and sides of the dimple board are protected by a geotextile soil fabric.
“The way we recommend you do it is to pull the filter fabric back from the core three inches, cut the core off and then tuck the fabric back behind the drain board, and then attach it to the wall.”
“That’s the number one issue we see – that there are exposed seams both at the top and side of the panels when they’re installed,” Kreikemeier said.
The J-Drain, which is made of polypropylene, comes in widths up to eight-and-a-half feet and is designed to be more cold-resistant than alternatives made of polystyrene.
“Drain boards are simple enough to install, but the components are critical,” Fallon says. “Everyone tends to overlook the components, and that’s where people get in trouble. The only time a drain board won’t work is if they get dirt in between the dimple-shaving and the fabric.”
A question often arises as to whether interior or exterior drainage represents the right approach. According to Steve Andras, president of Westport, Massachusetts-based Pioneer Basement Systems, the best approach is to install both.
“I believe you should do both in new construction,” Andras said. “As far as retro, I believe a closed system on the interior with access ports is best.”
Installation Tips
Just as crucial to good drainage is for contractors to use the correct method, and the correct timing, for grading and backfill. Done right, this step should help lead water away from the house.
Patience is one factor; a poured concrete wall may take several weeks to get to full strength.
“They don’t understand the structure of the building, meaning that the poured concrete wall is simply a retaining wall,” Carter said. “I’m actually seeing guys backfill walls that are less than 48 hours old, when it’s achieved very little of its strength.”
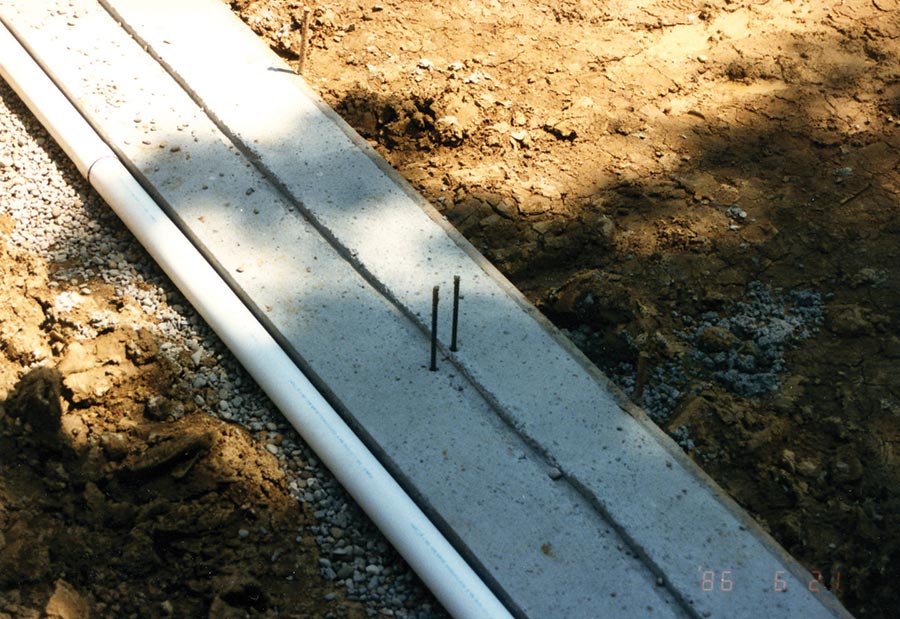
Proper drain tile installation: alongside the footer, in a clean bed of gravel, with the perforations facing down. After the walls are poured the tile should be covered with 2 feet of washed gravel, topped with straw, tar paper or a geotextile.
“They want to backfill so the carpenters can install the floor,” Carter said. “They’re doing it for ease of construction of the project, and they’re failing to realize it can cause big-time problems.”
The grading immediately adjacent to the building should be sloped about three inches for every five feet, at least 10 feet outward from the foundation—more in areas that get heavy rain.
Contractors should keep soil at least eight inches below where the framing starts, and be sure to plant trees, shrubs and flowers at least a foot away from the foundation.
Backfill also needs to be tamped firmly to limit settlement. Carter said many contractors err by failing to compact soil used for backfill.
“When it is dumped around your house, it has huge amounts of air in it,” Carter said.
“This dirt was fluffed up and pumped full of air when it was dug from the ground. It can take years and years for this ground to naturally compact.”
Summer 2008 Back Issue
$4.95
Midwest Flooding
Dealing with Drainage
Crack Repair for CMU Foundations
Getting Flat Roofs to Perform
AVAILABLE AS A PDF DOWNLOAD ONLY
Description
Description
Midwest Flooding
By Melissa Morton
Torrential rainfall in the upper Midwest has flooded hundreds of square miles along the Mississippi River and its tributaries. Waterproofers are helping out as much as they can.
Dealing with Drainage
By Dan Calabrese
Every building needs a drainage system. This involves everything from properly sloping the lot to ensuring drain tiles and sump pumps are adequate.
Crack Repair for CMU Foundations
By Clark Ricks
Concrete block, or CMU is commonly used for basement walls in much of the country. Modern materials have created new options for repairing the cracks that inevitably appear.
Getting Flat Roofs to Perform
By Dan Calabrese
Standard in commercial construction, flat roofs are also common for residential work in some regions. The key to performance is proper installation, quality materials and a slight pitch.
Additional Info
Additional information
| Magazine Format | PDF Downloadable Magazine, Print Mailed Magazine |
|---|