– By Basil Mewes and Dieter Köster
It’s Possible to Waterproof Leaking Basements From the Inside
Water and moisture con-siderably reduce the value of a basement as living space or storage area. When moisture enters a basement, the conditions for the formation of mold become favorable. And once mold has formed, it continually produces spores and releases them into the surrounding air, allowing them to spread through the rest of the building, which not only causes a musty smell but also reduces the living quality and even cause health disorders.
The cause of water or moisture in basements is usually ground water or ground moisture which penetrates into the basement through the floor slab or the basement walls. Such defects are frequently encountered in older buildings, but new buildings can also be affected.
Construction is usually carried out during the dry summer months, so designers, owners and craftsmen sometimes neglect the seasonal changes which will expose a basement to water in the fall and winter. As a result the waterproofing of new structures is often neglected and does not provide permanent protection.
Sources
A recent survey of leaking basements showed water comes from a variety of sources, but walls are the usual culprit:
- Occurrence of moisture
- Only on walls: 82.8 %
- Only on the floor: 4.1 %
- On walls and floor: 13.1 %
Moisture penetration on walls (Multiple entries were permitted)
- Larger areas: 58 %
- Around penetrations (pipes, cables,doors): 35 %
- Cracks: 28 %
- At the horizontal barrier: 27 %
- At the wall / floor junction: 22 %
- Other (partially multiple sources): 11 %
Moisture penetration on floors (Multiple entries were permitted)
- Cracks: 55 %
- Larger areas: 46 %
- Other (partially multiple sources): 6 %
This survey examined mostly basements built of masonry. Leaking basements which were built with concrete walls tend to show less moisture penetration in large areas but more water-bearing cracks.
Repair Options
 In order to restore the integrity of exterior basement waterproofing, the obvious approach is to excavate the ground in the area where the leakage is located and to repair the waterproofing layer. So called positive-side waterproofing is an effective and proven solution.
In some cases, however, it’s not possible to take this approach due to inaccessibility to the leaking area, for example because garages, driveways, property lines or roads abut directly with the leaking wall. Leaking floors are almost always inaccessible form the exterior. This leaves the application of a waterproofing on the inside of the basement as the only possibility. This is termed “negative-side waterproofing.”
The construction chemicals industry has developed products and methods which have made waterproofing basements from the inside possible. These products and methods are easy to apply and their effect permanent.
Additionally, the costs of waterproofing a leaking basement from the inside are usually much lower than the costs of waterproofing that building from the outside. The excavation of the ground on the outside of a building is a major cost factor which is not necessary when waterproofing from the inside.
Developers of negative-side waterproofing materials have to take into consideration that water frequently penetrates into the basement through the walls with high pressure, that the water usually carries diluted salts which can harm the building substrate, that the waterproofing needs to become permanently attached to the wall substrate, and that substrates are often not rigid but that motion can occur in cracks and joints.
General Work Steps
The work steps when waterproofing basements from the inside are usually the following:
Substrate Prepped: Loose particles and adhesion-inhibiting sub-stances must be removed in order to provide a substrate which the waterproofing materials can bond to.
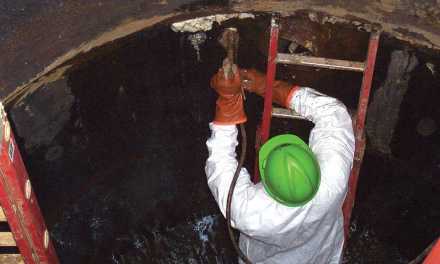
Active Leaks Stopped: The surface must be free of flowing water so that a waterproofing material which is applied will not be washed off before it can set sufficiently. Plugging the active leaks is usually not sufficient as a stand-alone repair, since over time the pressurized water may find other pathways through the wall or floor. Plug mortars and very fast setting specialized systems are suited to this task. Cracks in cast-in-place concrete walls are sealed via injection with a suitable polyurethane injection resin. Low-pressure epoxy is frequently injected after the water is stopped, in order to add structural strength.
Floor/Wall Joint Strengthened: Fillets are installed at the wall/floor junction in order to reduce tensions on the waterproofing layer caused by slight movements of wall and floor against each other. Repair mortars, often expanding and/or fiber reinforced, are a good choice.
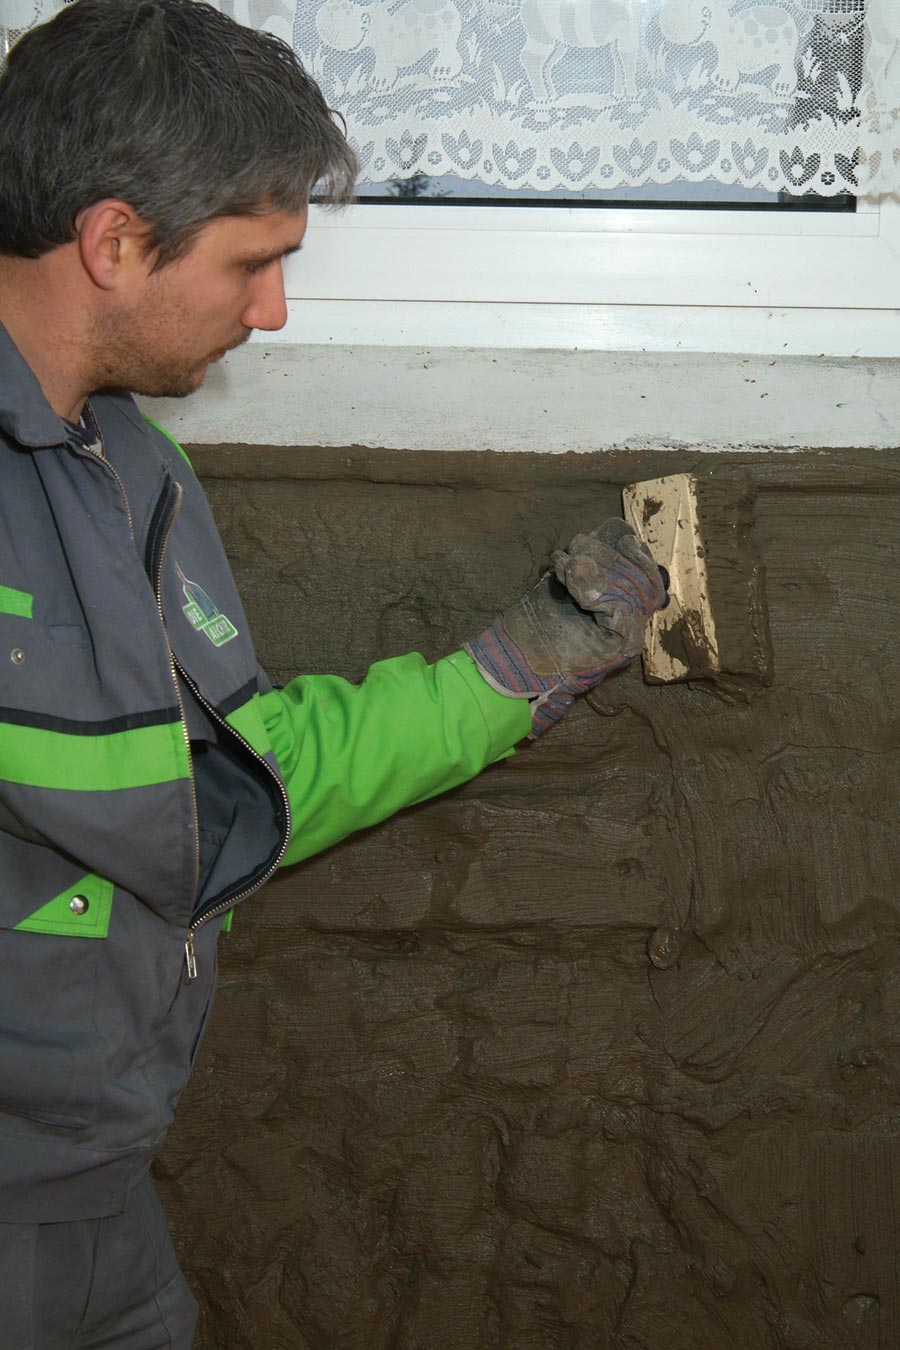
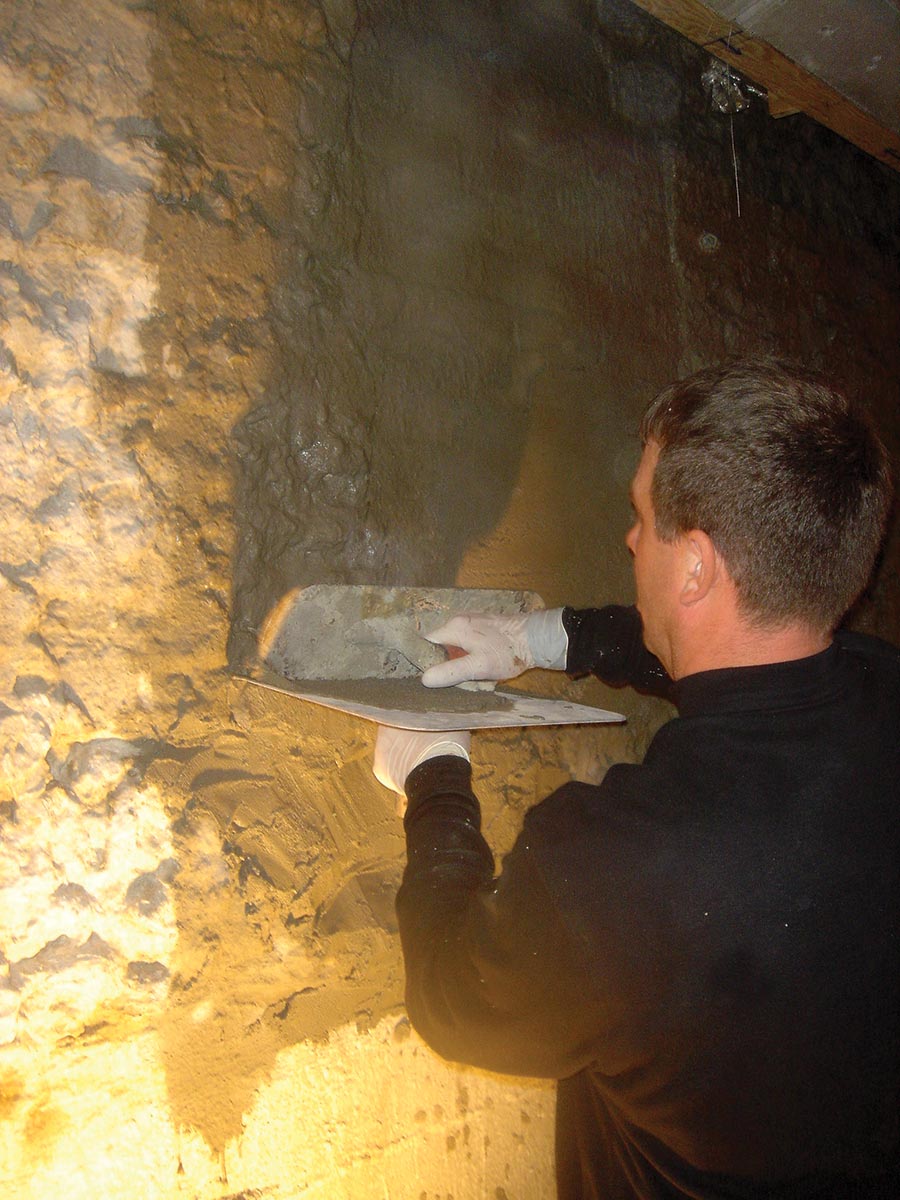
Waterproofing Applied: A variety of materials can be used, but the product selected has to be able to resist the water penetrating through the substrate under pressure. Therefore, only special waterproofing slurries are suited to this task.
Protection Course Installed: The waterproofing layer is protected against mechanical damage and against the formation of condensate on its surface. Restoration plasters are ideal for this purpose.
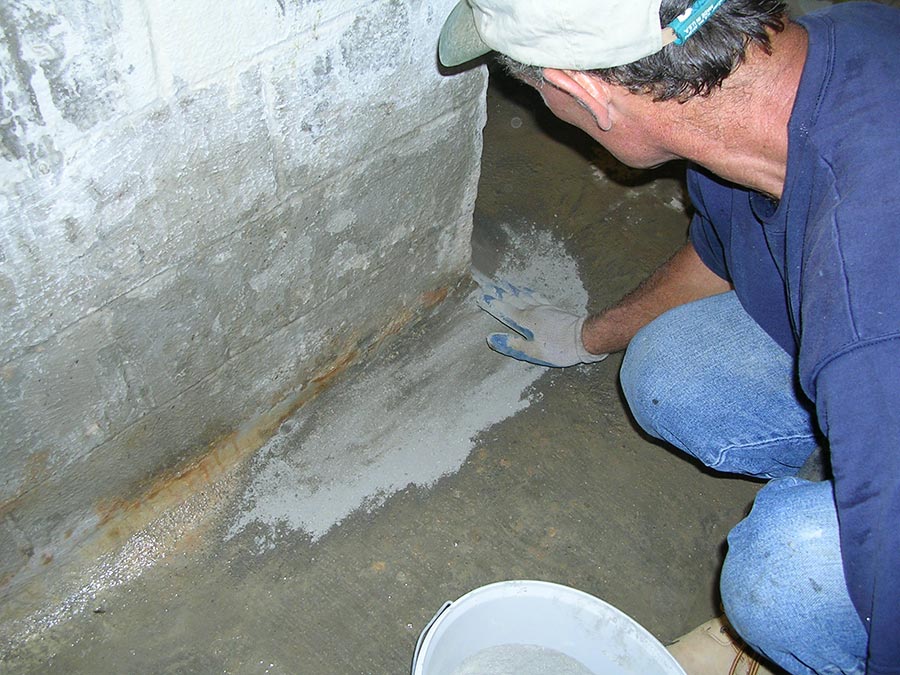
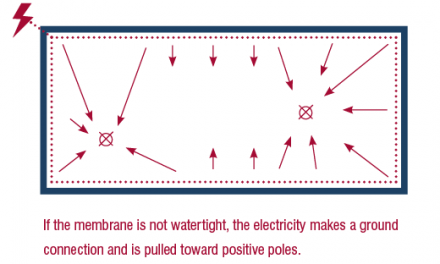
Fillets, also called coves, reduce stress at the wall/floor junction by spreading the pressure over a larger area.
Leaks Stopped
Flowing water on the surface of the substrate is a problem for any waterproofing material with a relatively long set time, because fresh material can be diluted or even washed off the surface by flowing water.
The standard method is to inject a polyurethane foam first to stop any flowing water and then, in a necessary second step, to inject an elastic solid body resin. In negative-side applications, it is not sufficient just to inject a rigid foam! Cracks can move and leak again after a certain time. Reinjection is essential for durability.
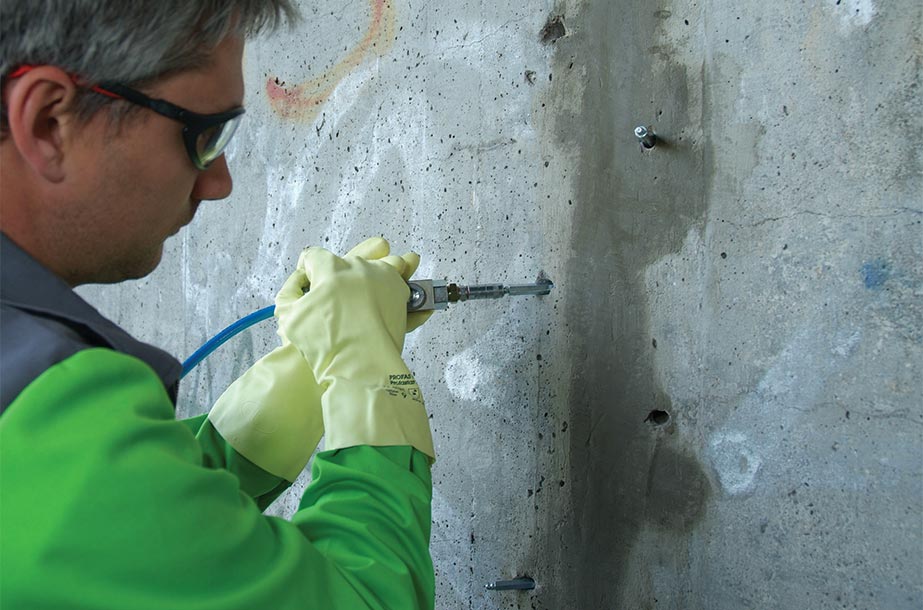
Boreholes are drilled into the crack from alternating sides in a 45° angle towards the crack center. Since the course of the crack below the surface is not known, this procedure ensures that at least every second borehole transects the crack. The polyurethane resin is injected into the boreholes with a high pressure injection pump via special valves, so-called injection ports, which are installed in the boreholes.
Polyurethane injection materials are the best choice for sealing cracks because they stay permanently elastic and bond well to concrete or brick. It is also important to know whether the crack is dry or wet because some injection materials need water to react whereas others do not react if water or moisture is present.
Fillets
The wall/floor junction is one of the most leak-prone areas of basements. It is the focal point of stress caused by movement and settlement. Even a very slight shift can cause a rigid connection to crack.
For example, seasonal temperature variations can cause significant movement. Similarly, when the top of a foundation protrudes out of the ground, the protruding part is directly exposed to the outside air temperature while the foundation or floor slab is situated much deeper below grade and is surrounded by a stable temperature throughout the year. The floor slab will expand or shrink much less due to seasonal changes than the walls.
Any waterproofing layer that is applied to this junction would have to withstand tremendous stresses. Concave fillets installed in the wall/floor junction can relieve this problem. These fillets won’t eliminate all movement between the wall against the floor, but the stresses are spread over the area of the rounded out fillet, instead of being focused on the point of that 90° angle.
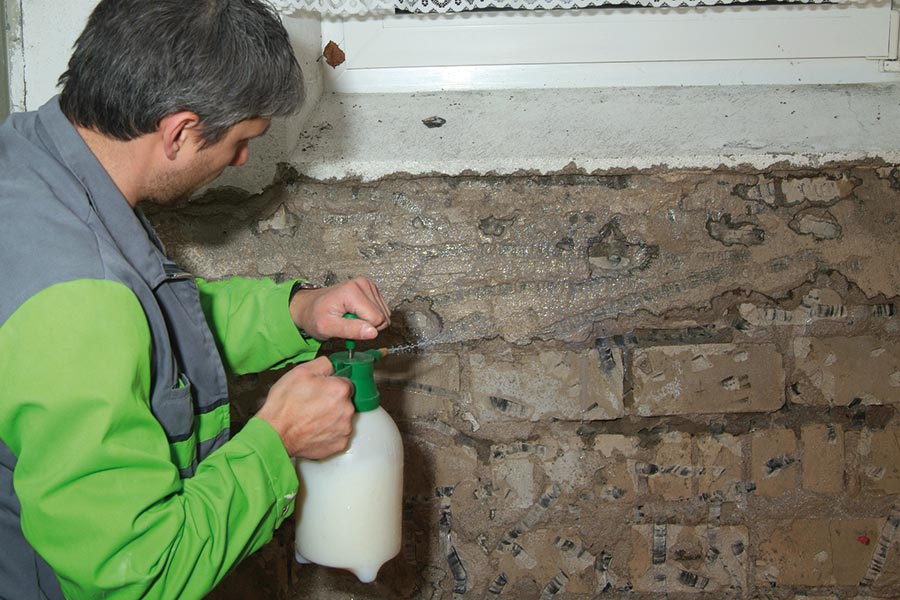
Most systems use a primer to ensure good adhesion to the substrate. Köster’s primer is applied over the waterproofing as well to inhibit the movement of salts.
Fillets are easy to install. The contractor mixes a high quality repair mortar, and places the fresh mortar on the inside corner of the joint. The fillet is rounded out using a trowel or even a piece of pipe. The leg length of a mortar fillet should be about 1.5 to 2.5 inches.
Negative-Side Waterproofing
Once the interior surface of the wall is dry, clean and stable, and fillets have been installed, the waterproof coating can be applied.
For successful negative-side waterproofing, the product should have the following properties:
- The waterproofing product should be mineral-based, just like the brick or concrete substrate. It has to become one with the substrate.
- The waterproofing product ideally penetrates a little into the substrate. That way it cannot be pushed off by water pressure.
- The material has to be open to vapor diffusion so that water vapor can penetrate the cured coating.
- The material should be free of chlorides so that it does not harm the steel reinforcement.
- The product should resist any high-water pressure coming from the positive side.
- The product should be easy to apply.
Wall Finishes
Waterproofing membranes should always be protected from mechanical damage. Because negative-side appli-cations are on the interior of the wall, they cannot be left exposed. Similarly, basements condensation can become a problem. A proper protection layer can solve both problems.
For instance, Koster makes a line of restoration plasters that provide a highly porous, breathable layer on the wall which also has a high mechanical resistance. They absorb water in vapor form so that the walls can “breathe” and help provide a comfortable and healthy room climate.
Conclusion
For new construction and most remedial waterproofing work, experts agree that the most effective waterproofing installation is on the positive (exterior) side of the structure.
However, negative-side applications do have their place. They’re effective as an emergency solution. Chris Strogilis, a Macon-based waterproofer, says he’s encountered countless occasions when the negative waterproofing emerges as the only option.
John D’Annunzio, president of Paragon Consultants, summarizes, “The primary advantage of negative side waterproofing is that the area is fully accessible after installation. Any further defects or required touch-ups can be repaired with no surface removal or intrusion to the substrate. This method also eliminates the need for sub-slabs and wall pointing for foundation waterproofing, which are required on positive side systems…. [However,] the installation of any system on the negative side is exposed to the added risk of having the waterproofing ‘pushed off’ or delaminated from the substrate by moisture that infiltrates the concrete in a liquid or vapor form. Waterproofing applied to the negative side of the structure also provides a passage for any ground containments or chemicals to enter into the substrate and deteriorate the concrete and corrode steel reinforcements.”
By carefully considering all of the factors involved and choosing appropriate products, negative-side waterproofing can be an effective solution to an otherwise difficult project.
Dieter Köster is managing director of Köster Bauchemie AG, a worldwide leader in waterproofing solutions. U.S. offices are headquartered in Virginia Beach, Va. For more information, visit www.koesterusa.com or call 877-425-1206.
Products for Negative-Side Waterproofing

In a few cases, the most cost-effective waterproofing method involves coating the interior side of the wall. Called negative-side waterproofing, this technique involves applying product to the dry or inside face of the surface.
Negative side waterproofing prevents water from entering occupied space, but it does not prevent water from entering the substrate. Therefore, if the wall will be subject to freeze/thaw cycles or if the surrounding soil contains corrosive materials, negative side waterproofing is not a permanent option.
Hydrostatic pressure is a major concern, as hydrostatic pressure will tend to push negative side products away from the substrate. Surface preparation is absolutely essential to ensure that the waterproofing layer adheres firmly to the substrate.
While a variety of products are marketed for negative side applications, some of the most effective are the cementitious coatings made by a handful of manufacturers.
Izonil makes a unique waterproofing plaster composed of Portland cement, sand, fibers and proprietary additives. It is completely waterproof when dry, yet remains permeable to air and water vapor. The fine grade plaster can be used as an undercoat, or applied by skilled applicators, as a final finish coat.
It was recognized as a “most innovative product” at the 2009 World of Concrete tradeshow, and has been used on jobs ranging from presidential palaces to cellars and sump pits, successfully restoring areas thought to be beyond repair.
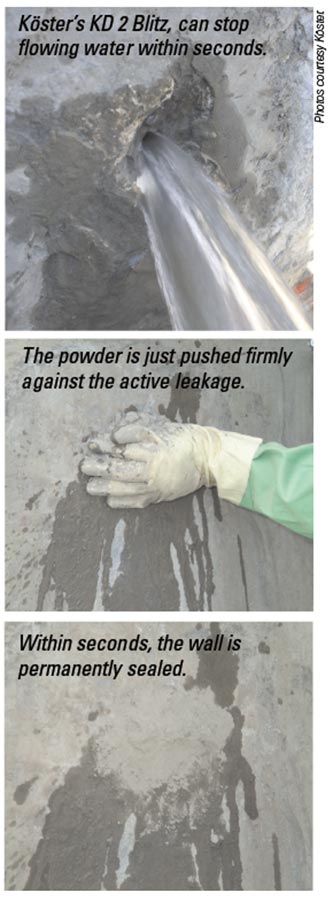
Köster makes an entire line-up of products for negative-side applications, including KD 2 Blitz, a highly reactive powder that can stop flowing water within seconds. Without mixing beforehand, the powder is just pushed firmly against the active leakage and reacts immediately to stop the flowing water. For cracks, their KB-Pur 2-in-1 fills cracks with either foam or an elastic, solid-body resin depending on the presence of water. Köster’s repair mortar can fix voids and honeycombing in the substrate, and is also used to form floor/wall fillets.
For the actual waterproofing layer, they market Köster NB 1, a waterproofing slurry with crystallizing and capillary sealing agents. It provides excellent pressure and abrasion resistance as well as excellent resistance to a wide range of chemicals. The material is applied using a brush to work it firmly into the substrate. The aim is that the waterproofing material crystallizes in the pores and subsequently becomes one with the substrate. A primer, Köster Polysil TG 500, is used to solidify the substrate and to inhibit the movement of salts. The company also makes restoration plasters intended as a final coat.
Xypex uses crystalline technology to seal walls and floors from the inside. Although it’s applied as a coating, Xypex does not rely on surface bonding to achieve waterproofing. Instead, the reactive chemicals in the Xypex coating migrate through the capillary tracts within the concrete to become an integral part of the concrete mass and seal it against moisture. It can withstand enormous hydrostatic pressure even when applied to the negative side of the wall.
Aquafin also makes a variety of products suitable for negative side applications, depending on the type and condition of the substrate. Their Aquafin-1K is the most straight-forward. It’s a single-component “just-add-water” powder that can be brushed, troweled, or sprayed onto the wall. It works well on stable brick, stone and masonry surfaces, and can be painted or over-coated without problems.
Aquafin-IC is a crystalline slurry coat that, like Xypex, only works on cast concrete surfaces. It reacts with moisture and free lime inside the wall to create crystals which grow into the concrete. While it can withstand enormous hystrostatic pressure, it cannot be painted or overcoated without special treatment.
Mortar-LN is a water-proof lining and parging mortar. When built up to 1/4” it is completely waterproof, and is a great solution for old stone or rubble walls. It allows the applicator to patch mortar joints and apply waterproofing at the same time.
Winter 2011 Back Issue
$4.95
Negative-Side Waterproofing
Ballasted Roof Basics
Drainage Do’s and Don’ts
AVAILABLE AS DIGITAL DOWNLOAD ONLY
Description
Description
Negative-Side Waterproofing
In some cases, the most effective waterproofing method involves coating the interior side of the wall. Here’s how this technique works, and the products used to make it successful.
Ballasted Roof Basics
When gravel, pavers, or vegetation is used to hold roofing components in place, the result is a ballasted roof. This time-tested technique recently received a new look from code councils, and the results may surprise you.
Drainage Do’s and Don’ts
Below-grade waterproofers know that a successful system is more than membranes. It starts with the eaves, gutters, and downspouts, and extends to landscaping, sprinklers, and ground slope.
Additional Info
Additional information
| Magazine Format | Digital Download Magazine, Print Mailed Magazine |
|---|


Thanks for explaining how you need to make sure there is no flowing water hitting the surface that needs to be waterproofed when it is being applied. Otherwise, it won’t work and you’ll waste money. I want to waterproof my house so I’ll make sure it isn’t going to rain when I have someone apply it.
WALL FINISHES
Waterproofing membranes should always be protected from mechanical damage. Because negative-side appli-cations are on the interior of the wall, they cannot be left exposed. Similarly, basements condensation can become a problem. A proper protection layer can solve both problems.
What is meant by a protection layer over the waterproofing membrane?
I applied a waterproofing to a below grade interior wall. A cementitious product called Impercem. I live near the sea and there is constant humidity and the waterproofing material sometimes does not adhere in certain spots on the wall. How Can I prevent the waterproofing material from coming off the wall