By David R. Poole
Photos courtesy of David Poole
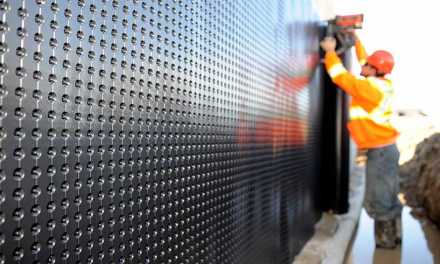
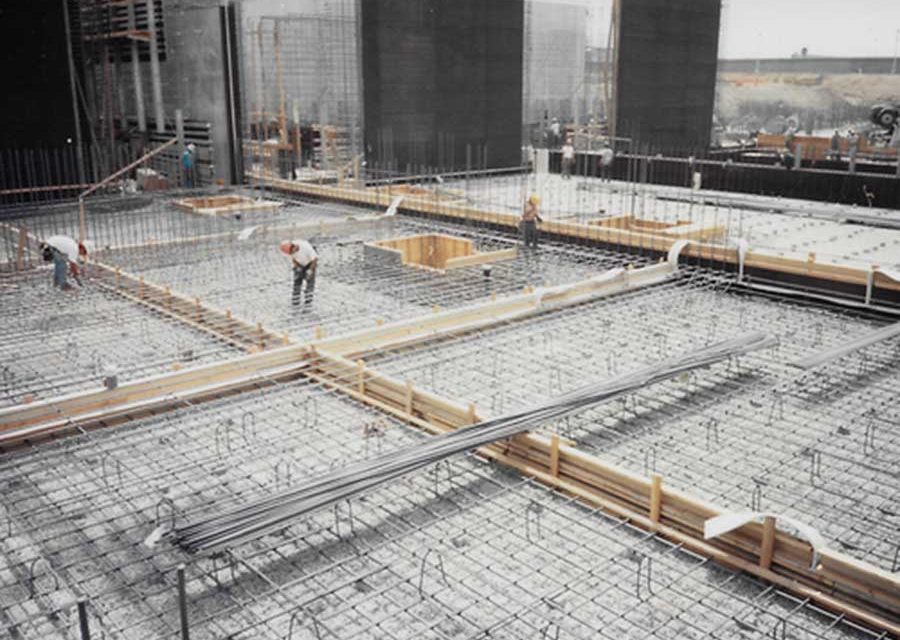
Waterstop in a water-reclamation project.

Water infiltration is one of the most persistent threats to the durability of concrete structures. Joints within concrete assemblies, from wastewater treatment plants and tunnels to dams, basements, and water reservoirs, present natural pathways for water migration. When improperly detailed or installed, these joints can compromise structural performance, reduce service life, and lead to costly repairs.
Embedded waterstops are typically manufactured from polyvinyl chloride (PVC) or thermoplastic vulcanizate (TPV). Waterstops are one of the most widely used methods for preventing water from passing through concrete construction joints. While the concept of embedded waterstops is straightforward, proper installation requires careful planning and coordination between design, formwork layout, and concrete placement procedures.
This article examines best practices for installing embedded waterstops, including splitting formwork for construction joints and incorporating a product known as a Keycup when a keyway is specified.
Understanding Embedded Waterstops
Embedded waterstops are flexible strips of formed plastic cast directly into concrete joints to block the passage of water. Half of the waterstop is embedded in the first concrete pour, while the remaining half becomes embedded in the second pour. The central web or bulb of the waterstop typically aligns with the joint centerline.
PVC waterstops have been widely used for decades due to their durability, flexibility, and chemical resistance. TPV waterstops offer similar performance with improved elasticity and resistance to certain environmental conditions and harsh chemicals.
Regardess of material type, the effectiveness of a waterstop depends heavily on correct positioning and secure placement during construction. Proper installation of a waterstop depends on several interconnected objectives. First, the waterstop must be maintained at the centerline of the joint, ensuring it is symmetrically positioned so that each half is embedded in one side of the joint. Any lateral offset compromises the waterstop’s ability to bridge movement and resist hydrostatic pressure equally on both sides.
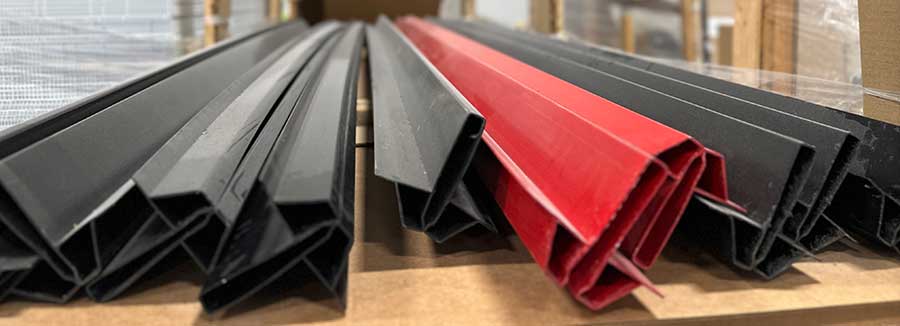
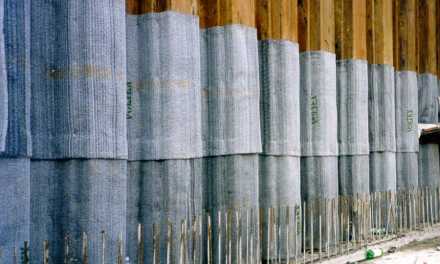
10-foot lengths of Keycup waterstop forming device.
Equally important is preventing movement during concrete placement, since the forces exerted by flowing concrete can easily displace an unsecured waterstop. It should be firmly tied, clipped, or otherwise anchored to reinforcing steel so it holds its position throughout the pour.
The integrity of the waterstop as a continuous barrier also depends on properly executed splices. All joints and transitions must be welded or factory-fabricated to form a seamless seal. Gaps, overlaps, or incomplete fusion are among the most common sources of waterstop failure. Finally, the concrete surrounding the waterstop must be placed and consolidated so that no voids or honeycombing develop in the vicinity of the waterstop.
Failure in any of these areas can lead to leaks that are difficult to repair once the structure is complete.
Planning for Waterstop Installation
Successful waterstop installation begins well before the first concrete pour. Contractors should review the design documents carefully to determine:
- Waterstop type and profile
- Joint location and orientation
- Changes of direction (fittings)
- Whether a construction joint includes a keyway
- Required splice methods
- Attachment points within the formwork
Because waterstops run through construction joints, they must be integrated into the formwork system. This often requires splitting the formwork at the joint line to hold the waterstop securely in place.
Coordination among the forming crew, rebar installers, and concrete placement team is essential to ensure the waterstop remains properly aligned throughout construction.

Profile view of Keycup.
Splitting Formwork to Install Waterstops
In most installations, embedded waterstops are secured by splitting the formwork along the joint location. This approach allows the waterstop to be firmly clamped between two form panels, ensuring it remains in the correct position while concrete is placed.
Step 1: Identify the Joint Line
The first step is to mark the exact location of the construction joint on the formwork system. The waterstop should align precisely with this joint line so that its center axis lies directly on the joint centerline.
Accuracy is critical. Even minor deviations can cause one side of the waterstop to become improperly embedded.
Step 2: Split the Formwork Panel
Once the joint location is established, the form panel is split horizontally or vertically, depending on the joint’s orientation.
For wall construction, this typically involves first cutting the form panel along the joint line. Then, creating two separate form pieces while leaving a gap that allows the waterstop to pass through. The split should be clean and straight to ensure that the form panels close tightly around the waterstop.
Step 3: Clamp the Waterstop in Place
The waterstop is then positioned so that its center aligns with the joint centerline. The two formwork panels are reassembled around the waterstop, effectively clamping it in position.
Contractors often use form ties, nails, or staples through the outer ribs, or manufacturer-approved eyelets, hog rings, or clips. These attachment points should be placed along the edges of the waterstop, never through the center bulb or sealing ribs.
Step 4: Verify Alignment
Before concrete placement begins, inspectors should verify that the waterstop is straight along the joint and centered within the formwork. Ensure it is free of twists or folds and securely anchored. A final inspection helps prevent problems that may only become apparent after the first pour.
Concrete Placement Around Waterstops
Concrete placement must be performed carefully to ensure full consolidation around the waterstop. Poor consolidation can leave voids that compromise the water barrier. Best practices include placing concrete evenly along the joint and using internal vibrators carefully around the waterstop. Be sure to avoid any direct impact from large concrete drops.
The goal is to fully encapsulate the embedded half of the waterstop without displacing it.
Once the first pour is complete and the forms are removed, the exposed half of the waterstop should remain clean and undamaged, ready for the next concrete placement.

Keycup in split view with embedded waterstop.
Incorporating Keyways and Keycup
Some construction joints include a keyway, which is a recess formed in the first concrete pour to improve shear resistance between successive placements. A keyway helps transfer loads across the joint and provides additional mechanical interlock between concrete sections. When a keyway is specified, installers must ensure that the waterstop and the keyway do not interfere with each other.
This is where a product known as Keycup is commonly used. A Keycup is a removable forming device designed to create a keyway while allowing the waterstop to remain properly positioned within the joint. Keycups are manufactured from plastic and attach directly to the waterstop profile.
The Keycup forms a void around the waterstop in the first pour, creating the desired keyway geometry. After the concrete sets and the forms are stripped, the Keycup is removed, leaving a clean recess ready to receive the second concrete placement.
This approach provides several advantages because it maintains proper waterstop alignment and ensures a consistent keyway shape. This simplifies formwork installation and reduces the risk of damaging the waterstop.
Installing Keycup with Embedded Waterstops
The installation process for Keycup follows several key steps.
Positioning the Waterstop
As with any waterstop installation, the strip must first be aligned with the joint centerline. The waterstop is secured within the split formwork so that half of its profile will be embedded in the first pour.
Attaching the Keycup
The Keycup is then fitted over the waterstop profile at the joint location. It is designed to snap or fasten into place around the waterstop ribs. Installers should verify that the Keycup sits flush against the formwork, the waterstop remains centered, and no gaps exist between the Keycup and the form surface.
Securing the Assembly
The formwork is closed around the waterstop and Keycup assembly, locking the components in place. Fasteners may be used to prevent movement during concrete placement, but care must be taken not to puncture the waterstop.
Completing the First Pour
Concrete is then placed and consolidated as usual. The Keycup creates the keyway void, while the waterstop half embeds in the concrete. Once the concrete has cured sufficiently, the formwork is removed, and the Keycup is extracted. The resulting keyway should be clean and well-defined.
Splicing Waterstops
Long waterstop runs require field splicing to maintain continuity across joints. Proper splicing is essential to prevent leakage paths. PVC and TPV waterstops are typically spliced using heat welding, which fuses the material into a continuous piece.
Splice procedures should follow manufacturer guidelines closely and typically involve first cutting the ends squarely and heating the material to the specified temperature. The second step involves pressing the pieces together under controlled pressure and allowing the splice to cool without disturbance. Poorly executed splices are among the most common causes of waterstop failure.
Common Installation Challenges
Even experienced crews encounter challenges when installing embedded waterstops. Waterstop movement is one of the most frequent issues. Concrete vibration can cause improperly secured waterstops to shift out of alignment. The solution is to ensure the waterstop is firmly clamped within the formwork and supported along its entire length.
Dense reinforcement near joints can prevent proper consolidation around the waterstop.
The solution for this challenge is to use smaller aggregate mixes if necessary and ensure careful vibration.
Exposed waterstop sections may be damaged by foot traffic, tools, or equipment before the second pour. To avoid this scenario, protect exposed waterstops with temporary coverings or barriers (waterstop protectors).
Inspection and Quality Control
Inspection is critical at multiple stages of installation. Before the first pour, confirm the correct waterstop profile and verify alignment with the joint centerline. Inspect your splices and check for secure attachment.
After form removal, inspect the exposed waterstop for damage and confirm the keyway geometry. Ensure the cleanliness of the joint area.
Before the second pour, remove any debris. Verify the waterstop remains centered. Repair any minor damage if possible.
These quality control measures help ensure the waterstop performs as intended throughout the structure’s life.
The Role of Training and Coordination
Proper waterstop installation is both a technical and procedural task. Successful installations depend on clear communication between design engineers, formwork crews, reinforcement installers, and concrete placement teams. Training crews on correct handling, splicing, and positioning techniques significantly reduces installation errors. Manufacturers often provide installation guides or on-site technical support to assist contractors during the process.
Conclusion
Embedded waterstops remain one of the most reliable methods for controlling water infiltration in concrete structures. However, their performance depends heavily on proper installation practices. Splitting formwork to clamp the waterstop securely, carefully aligning the joint centerline, and incorporating Keycup when keyways are required all contribute to a successful installation. Attention to detail during splicing, concrete placement, and inspection further ensures that the waterstop performs its intended function.
When installed correctly, embedded PVC or TPV waterstops provide durable, long-term protection against water intrusion, helping preserve the integrity and service life of critical concrete infrastructure.

David R. Poole
David R. Poole has been with J P Specialties Inc. for over 30 years and the president since 2008. David also served (2008 to 2022) as secretary of the American Concrete Institute (ACI) 350 Environmental Engineering Concrete Structures Subcommittee K (Hazardous Materials), and G (Tightness Testing). David contributed to ACI’s “Hazardous Material Containment in Concrete Structures.” David’s book “The Little Book of Waterstop” is the only book of its kind and is freely available for download. An active public speaker, David’s engineering seminars are requested nationwide by significant engineering firms. David has also taught waterstop theory, technology, and installation to project owners, concrete accessories distributors, and contractors in the field. David has consulted on and written national and international CSI-format 3-part specifications for various engineering firms and governmental agencies and helped rewrite the American Water Works Association (AWWA) non-proprietary guide specification for waterstop.
Summer 2026 Back Issue
Price range: $4.95 through $5.95
Embedded Waterstop Installation Best Practices for Durable, Watertight Concrete Joints
Crawlspace Health and Safety
High-Performance Foundation Coatings
Green Infrastructure Solutions for Today’s Rooftops
Description
Description
Embedded Waterstop Installation Best Practices for Durable, Watertight Concrete Joints
By David R. Poole
Waterstops are one of the most widely used methods for preventing water from passing through concrete construction joints. While the concept is straightforward, proper installation requires careful planning.
Crawlspace Health and Safety
By Vanessa Salvia
Left untended to, a crawlspace can undermine a home’s safety, compromise air quality, and expose its occupants to a range of biological and chemical hazards.
High-Performance Foundation Coatings
By Vanessa Salvia
Get foundation waterproofing wrong and it’s difficult if not impossible to remediate. Get it right and the building is protected for decades.
Green Infrastructure Solutions for Today’s Rooftops
By Vanessa Salvia
Roofs are no longer just protective surfaces. Now, they are considered key pieces of urban stormwater infrastructure.
Additional Info
Additional information
| Weight | N/A |
|---|---|
| Magazine Format | Digital Download Magazine, Print Mailed Magazine |
Related products